Pages

Wednesday, September 28, 2011

Onion Chapati Turnovers

Ever since I got Mark Bittman's "The Food Matters Cookbook" (and haven't shut up talking about it) I've been intrigued by the recipe for these turnovers.  I like onions, I like turnovers, but what the heck is chapati.  Relying on my superior researching skills wikipedia I find that chapati is unleavened flatbread.  Another thing that I enjoy...so these puppies just had to be made.


Not a difficult recipe at all.  Slightly time consuming.  But if you enjoy onions as much as I do, I'd say it's worth it.  So this is not a flaky, tender crust.  It's definitely got some chew and some body to it. (Did that make sense?)

We had ours with a pot of beans and I thought it was a pretty darned nice combination.  Here's a pic of the inside....


Here's Mark's recipe if you're interested.  

3 cups whole wheat flour
salt
1 cup warm water
4 large onions, halved and sliced (I only used 3 but they were GIANT)
1/4 cup olive oil
all purpose flour, for rolling the dough


Put the flour in a food processor, add 1 tsp salt and with the machine running pour in the water.  (I used my KA with the dough hook)  Process about 30 seconds, the dough should be barely sticky.  If too dry add water 1 tbsp at a time and process about 5 to 10 seconds after each addition.  Put the dough on a lightly floured surface, cover, and let rest for at least 30 minutes or up to 2 hours.  You can make ahead, wrap in plastic wrap, and refrigerate up to day.  Bring back to room temp before proceeding.  

Put the onions in a large skillet over medium heat.  Cover and cook, stirring occasionally, until onions are dry and almost sticking to the pan, 20-25 minutes.  Stir in the oil and a large inch of salt and turn the heat down to medium low.  Cook, stirring occasionally for 15 minutes or longer, depending on how caramelized you want the onions to be.

Once the dough has rested, divide it into 18 pieces.  Heat the oven to 450F and grease a couple baking sheets.  Using ap flour as necessary for your hands and the board, pat or roll each piece into a thing 4 1/2 inch circle.  


Top each circle with a heaping tablespoon of the onions and moisten the edges of the dough with a little water.  Fold one edge over onto the other and press with the tines of a fork to close.  Put the turnovers on the prepared baking sheets.  Bake until the dough is golden brown and hot, flipping over once, 20 to 30 minutes.  Serve warm or at room temp.  They will keep for a couple days wrapped or in a sealed container at room temp or in the refrigerator and for months in the freezer; gently reheat before serving.


On a side note, I was given the opportunity to try a 4 pack of Cholula hot sauce recently and I was tickled to receive them in this cute little carrying case!


I got to try Original, Chili Garlic, Chili Lime, and Chipotle.  I liked them all, but the Chili Garlic was especially good with quesadillas, and I liked the Chipotle really well with beans.  Can't wait for the next taco night!
Cholula's website has lots of good ideas for using the sauce, and also a coupon if you like them on Facebook.  

Friday, September 23, 2011

Hot and Sour Soup

I learned to love hot and sour soup in a little restaurant in southeast Missouri. Probably not the mecca of Asian cooking, but this place was where I was introduced to somewhat authentic Chinese cuisine.  And it's been the gold standard for me ever since.  I can't say this soup was good as what I remember from all those years ago, but it definitely cured my craving, using ingredients I could find in any grocery store.


This took me back to getting that first whiff of Mr. Kim's soup and knowing pretty soon my eyes would be watering and my nose would be running.  That's a sign of a good soup right there.  I found this recipe at a blog called Cookin' With Cyndi and changed it up quite a bit to suit what I had on hand.  If you need your sinuses cleaned out, whip some up and start sniffing!


8 oz. fresh mushrooms, chopped (I used baby bellas)
3/4 cup cabbage, thinly sliced
32 oz. chicken or vegetable broth
2 1/4 cup water, divided
1 tbsp fresh grated ginger
1 tsp minced garlic
1/2 tsp red pepper flakes
1/2 tsp ground white pepper
1/4 cup rice vinegar
sriracha sauce or chili oil to taste 
1 tbsp soy sauce
fresh ground black pepper
2 1/2 tbsp cornstarch
2 eggs, beaten
1/2 cup chopped green onion
1 tsp sesame oil

Combine broth and 2 cups of water, ginger, garlic and red pepper flakes and bring to a boil.  Add mushrooms and cabbage and simmer for about 5 minutes.  Add vinegar, soy sauce, white and black pepper, and sriracha.  Simmer about 5 more minutes.

Combine remaining 1/4 cup water with cornstarch and stir into broth mixture.  Bring to a boil.  Simmer 3 more minutes.  Slowly pour in eggs in a steady stream while stirring constantly.  Remove from heat.  Stir in onions and sesame oil.  

*this is my version, you can click the link above to get the original at Cyndi's website


Served with an unphotogenic brown fried rice, it was a pretty nice meal.  To me anyway, not sure the family was as into it as I was.


So, is anyone out there doing the Google+ thing?  I'm there but it's kinda lonely.  

Saturday, September 17, 2011

Crumb Top Cherry Pie


A beautiful and easy cherry pie to make you smile.


And to cause your dog to drool.


Easy stuff, and so good.  Found the recipe at Jam Hands.  The crumb topping really makes it!  Enjoy!


1 1/2 cup sugar (more or less to taste)
3 tablespoons cornstarch*
2 cans OregoN Red Tart Pie Cherries, drained, reserve juice from one can  *I just used two cans of regular cherry pie filling...it's already thickened.
1/4 tsp red food coloring (optional)
1/4 tsp almond extract (optional)
1 tablespoon butter or margarine
1 prepared pie crust

Crumble Topping:
1/2 cup butter, cold
1/2 cup sugar
1 c. flour

1. Preheat oven to 400 degrees F. Drain the cherries and reserve the juice from only one can. In a saucepan, stir the cherry juice into the combined mixture of the cornstarch and sugar. Cook over medium heat, stirring constantly until thickened. Gently stir in cherries and optional ingredients. Remove from heat. Pour filling into pastry lined pie pan. Dot with butter or margarine.

2. Prepare crumble topping: Using a pastry cutter or fork, blend the crumble topping ingredients together. Sprinkle over the pie.

3. Bake 45 minutes or until crust browns and filling begins to bubble. If necessary, cover edges with aluminum foil during the last 15 minutes to prevent over-browning. Cool pie several hours to allow filling to thicken before slicing.

Thursday, September 15, 2011

White Bean Veggie Burgers

Okay, I'm moving forward, and just going to pretend that last post ever happened.  I'll deny it, there's no proof.  Let's eat something healthy now.


I saw these a while back on Reeni's blog, Cinnamon Girl and thought they looked delicious.  What's not to love?  They're full of delicious things like beans and sauteed veggies.  


They really made the house smell wonderful.  We didn't eat ours burger style, just with a fork.  They were so flavorful, and the whole family actually liked them.  That's saying a lot!  

Here is Reeni's recipe....hope you like it :)


2-3 tablespoons olive oil
1 small onion, finely chopped
4 large garlic cloves, minced
1 roasted red pepper, diced  (I didn't roast mine)
1 teaspoon dried thyme
sea or kosher salt and fresh black pepper
2 cans white beans, drained and rinsed
1 cup baby spinach, finely chopped
2 tablespoons fresh lemon juice
½ cup seasoned bread crumbs
1 egg, beaten
olive oil or vegetable oil, for pan-frying


1. Heat olive oil in a large skillet over medium low heat and saute onion until translucent, add garlic, saute until fragrant, add red pepper and thyme, season well with salt and pepper and saute 4-5 minutes, remove from heat.
 2. In a large mixing bowl mash the beans with a potato masher leaving them a little chunky. Add spinach, lemon juice, bread crumbs, egg and sauteed vegetable mixture. Season well with salt and pepper. Use a fork to mix well. Refrigerate 1/2 - 1 hour
.3. In a large skillet heat enough oil to generously cover bottom of pan over medium heat. Shape into 6 equal-sized patties. Fry 3 patties at time, about 5 minutes on each side or until browned.
Makes 6 patties 

Monday, September 12, 2011

Desperation Dessert

You know guys, I've been trying to be good...I really have.  I've been eating the whole grains.  I've been eating a lot less meat, and even eating the veggies (sorta).  But sometimes I just need something big and gooey and chocolate.  I'm a sweets girl at heart.  People who say they don't like sweets...I just don't get them.  I could eat them morning, noon, and night.  It was time I had a big chocolate treat, but since we've been trying to eat healthier there really wasn't anything in the house.  That's how this desperation dessert was born.


I starting scrounging through the cabinets, just looking for something I could throw together to resemble dessert.  I found some ladyfingers but they smelled like they had been in the cabinet too long.  I found some buttercream frosting that had been unsealed then stuck back in the cabinet to see what sort of things would grow on it.  Then I found this stuff....


....and some cool whip way back in the freezer.  So the layering began.


The girl was more than happy to help since she hasn't been eating as many sweets either, and I'm afraid she's inherited the old sweet tooth.  Or picked up my bad habits (sure, blame the mom!).  


So in a nutshell, here's what we did...

Start with:
1 box of instant pudding (mix according to directions)
Graham crackers (or ladyfingers if you've got them)
Cool whip
peanut butter chips
chocolate frosting

Layer graham crackers in bottom of 8x8 baking dish.  Pour in half the pudding, sprinkle with peanut butter chips, then cover with half the cool whip.  Repeat this process once, top with graham crackers, and smear frosting all over it.  Sprinkling with pb chips on top of course.  Chill for as long as you can resist eating it.  In our case it was about an hour.
And voila...dessert is born!  I suppose this is a lot like the potluck favorite eclair cake, just simplified using what's on hand. 


I'm not giving up on the healthy stuff, just a side trip now and then :)

Tuesday, September 6, 2011

Noodles with Spicy Cabbage and Pork

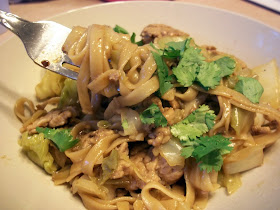
It seems the food I'm cooking lately is just so very...brown.  Maybe I should just call it "earthy".  Could be part of the reason I've switched to this pink and blue background since my food is somewhat lacking in color.  But the flavor of this noodle dish (once again from Mark Bittman's "Food Matters" cookbook) made up for the lack of color.


I really liked just about everything about this dish.  I loved the texture of the rice noodles; it had just about the right amount of heat for me.  I think the only thing I might do different is just go all vegetarian and omit the pork, maybe add some mushrooms.  It was pretty good left over too.  Here's the recipe. 


Salt
2 tbsp vegetable oil
8 oz ground pork or thinly sliced pork shoulder
1 tbsp minced garlic
1 tbsp minced ginger
1 head Napa cabbage, chopped (I used regular cabbage)
8 oz rice, buckwheat, or wheat noodles
3 tbsp soy sauce
1 tbsp sesame oil
2 tsp chile oil
black pepper
chopped cilantro
lime wedges

1. Put the oil in a large deep skillet; add pork and brown it, sprinkling with salt.  Remove from pan with slotted spoon and lower heat to medium low.

2.  Add garlic and ginger to skillet, stirring occasionally cook about one minute.  Add the cabbage, along with 1/2 cup water and cook about 15 minutes, stirring occasionally. Lower the heat and cook about 5 minutes more until cabbage begins to brown.  In the meantime cook noodles according to directions, making sure they don't get mushy.  Drain the noodles and reserve some of the cooking water.

3.  Toss the noodles in the skillet along with the pork, soy sauce, sesame oil, chile oil, and black pepper.  Add some of the cooking water if the mixture seems too dry.  Sprinkle with cilantro and serve with lime wedges.  
Pin It